Recently we’ve helped a few of our Marketo clients update Marketo’s default unsubscribe landing page. You may be looking to do this yourself to enhance the user experience for your prospects or to match your company brand. In this post, I’ll show you how to tackle this project, including the pros and cons of each approach, and all the required steps in Marketo. Let’s go!
>> Related: 6 Ways to Handle Those Pesky Spambot Clicks in Marketo <<
In this post:
Step 1: New Marketo unsubscribe landing page or revise the existing?
First, decide if you will edit your existing default Marketo unsubscribe landing page or if you will create a brand-new Marketo unsubscribe landing page to replace the default. Both will work just fine and there are two options outlined below to inform your decision.
Option 1: Edit the existing default Marketo Unsubscribe landing page. For this option you’ll head into Design Studio within your Marketo instance to locate the existing landing page. Note that this page name will be unique to the phrasing in which your Marketo Instance was first set up.


You’ll then edit this landing page like you would any landing page in your instance, by highlighting the default page, and selecting “Edit Draft”. This will open in a new tab where you’ll have editing options available like, adding images, adding in Rich Text messaging, and form edit features. Once you are satisfied with the design, the messaging and the form, under landing page actions, select approve and close in the drop-down.
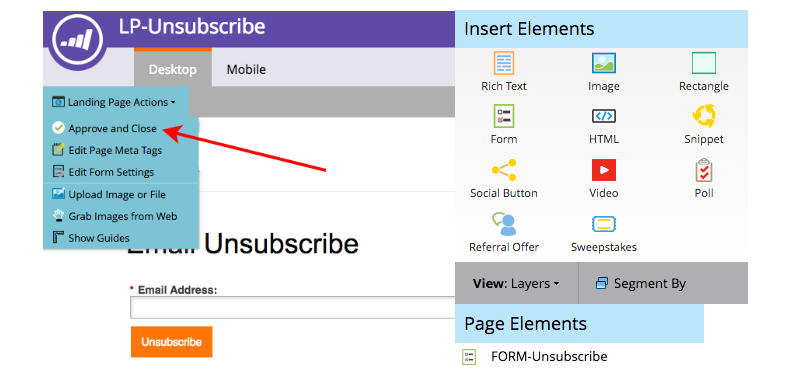

This is the easiest way to edit the page to match your company’s branding. If you chose this step, your default Marketo landing page updates will be in production after you’ve approved your page. If you would like additional instructions on how to format the Email URL text and style, scroll down to “3 ways to change or modify the unsubscribe text in Marketo Emails” instructions below.
Option 2: Create a new Marketo unsubscribe landing page that references the current unsubscribe form used on the default Marketo unsubscribe landing page. You’ll use this step if you wish to keep the {{system.unsubscribeLink}} token or Marketo default link in emails as a simple way to drive folks to your newly designed unsubscribe landing page.
Note: Alternatively, you can create a new form if for example you wanted additional fields on your unsubscribe form, such as fields related to a more robust subscription management center. Instructions on how to do that will be in a future post, but if you pressed for time I recommend this informative article on Subscription Centers.
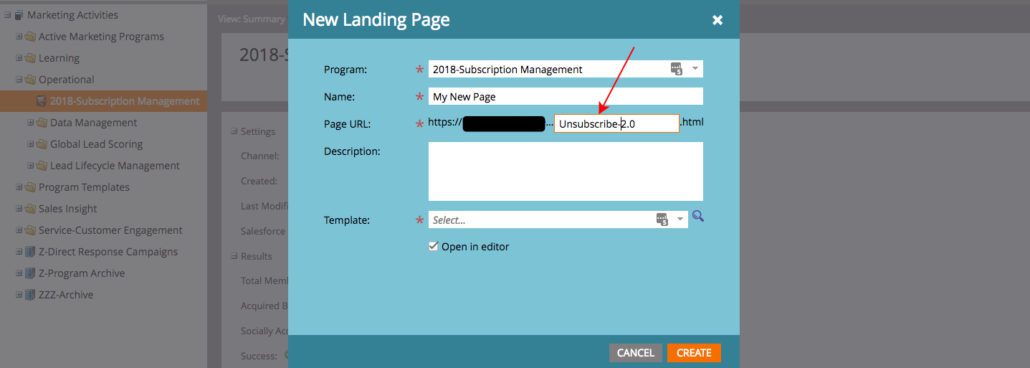
It is considered best practice to create your new unsubscribe landing page in Marketo Activities using an Operational Default Program Type.


Next, you’ll create your page with your desired form type either the one that is used on the default Marketo page or a new form that you previously created. You will be changing the name of this Page URL in future steps to match the default URL, so just name your Page URL something simple, in the screen shot below I chose Unsubscribe-2.0. Once your new unsubscribe landing page is ready and tested you’re ready for step 2.

Step 2: Redirecting the default Marketo unsubscribe landing page URL to your new page
Note: Before you edit the URL settings for the Unsubscribe redirect, make sure it has been a few hours since your last instance email send. This is because the following steps will render the current unsubscribe page as unavailable until this process is fully implemented. Additionally, these steps are only needed if you selected option 2 above, meaning you created a brand new unsubscribe landing page.
It’s important for you to know that the Marketo’s {{system.unsubscribeLink}} token will always point to: /UnsubscribePage.html default page, so you’ll want that default URL reassigned to your newly branded unsubscribe page, from the previous step. This is simple when you use the Marketo URL tools.
1. Head back into design studio, where your old/current unsubscribe page is located in Marketo. Remember we did this in option 1 above. You’ll then click Landing Page Actions > URL Tools > Edit URL Settings:
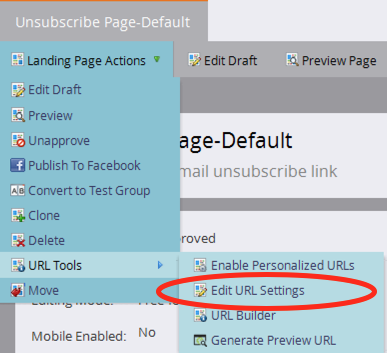

2. In the dialog box where it says “New URL: UnsubscribePage” you’ll want to change that name. I suggest just adding Old-Version or something to that affect. By renaming the systems generated URL page here, the system will no longer look at this page link because the URL has changed from the system default URL ending in:/UnsubscribePage.html. This step will free up the system URL, so it is available for your new page.
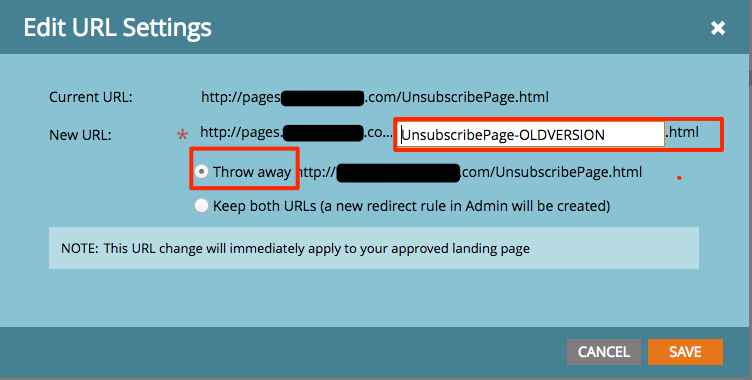

3. Next you want to make sure you check the box “throw away”, which actually means you’re releasing the default system URL, as stated above. This step will ensure the system default URL is available for your new unsubscribe landing page to use. Once you are finished editing click save.
4. Navigate to your new Marketo unsubscribe landing page and do the exact same steps above: 1 & 2, to edit URL settings. This time though you’ll give the New URL name the default Marketo UnsubscribePage.html name that you got rid of in the previous steps. Now your New URL name should only include UnsubscribePage in the URL text box. You’ll then throw away the previous URL that your new unsubscribe landing page used when you first built the page. Once you are done click save.
Viola! Redirecting the default Marketo unsubscribe landing page to your new landing page will automatically appear in emails, since you redirected the default Marketo unsubscribe landing page URL. Now if you want to further format the way the unsubscribe token appears to your email recipients, there are additional instructions below.
3 ways to change or modify the System Unsubscribe appearance in Marketo emails
1.) Ignore the issue, as stated above Marketo is smart and will automatically detect if there is not an unsubscribe link in your emails, and will place the default text with the URL you handled in step 2 above. Below is an example of what the email html code & text looks like:
<p><font face="Verdana" size="1">This email was sent to {{lead.Email Address}}. If you no longer wish to receive these emails you may <a href="%mkt_opt_out_prefix%UnsubscribePage.html?mkt_unsubscribe=1&mkt_tok=##MKT_TOK##">unsubscribe</a> at any time. </font></p>
Now if you want to customize the unsubscribe email text, head over to Admin > Emails. In the right hand portion of your screen you will see the default Unsubscribe HTML | Text | Web Page HTML and Web Page Text. You can edit the text and HTML style in each of these boxes; however, you won’t need to update the URL here if you have completed steps 1 and 2 above because you’ve already updated the default unsubscribe landing page token link. Once you are happy with your changes click save.
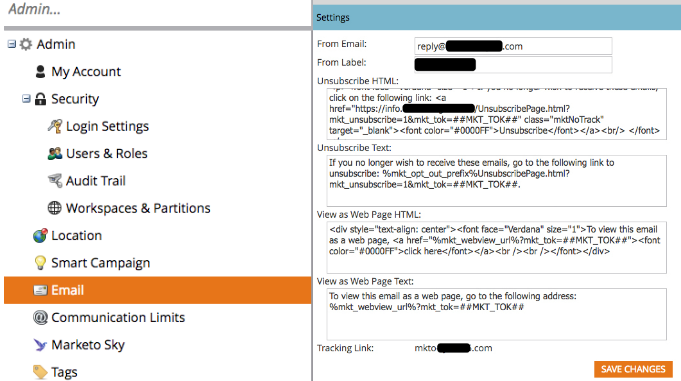

2.) Add the {{system.unsubscribeLink}} to your emails as the href in an <a> html tag. You can do this in your main email templates so it’s hard coded there or left to your other Marketo users. This will be enough for Marketo to automatically know that it should replace this token with the proper link and that it should not add the default unsubscribe link. So
<a href="{{system.unsubscribeLink}}">my unsub link</a>
will become
<a href="http://mktolpsubdomain.company.com/UnsubscribePage.html?mkt_unsubscribe=1&mkt_tok=##MKT_TOK##">my unsubcribe URL</a>
in production.
3.) *Note you do not need to do this step if you’ve done 1 and/or 2 in the previous steps. Additionally, this step is primarily used for the use case where you may have embedded the unsubscribe form on a website page.
Add your new custom unsubscribe URL that directs towards any Marketo Landing page OR Website page either in your Email Templates in Design studio, or within the email editor. This URL needs to include “?mkt_unsubscribe=1&mkt_tok=##MKT_TOK##” at the end of the <a href=”http://[mktolpsubdomain] or [www.yourcompany.com?mkt_unsubscribe=1&mkt_tok=##MKT_TOK##” that will be enough for Marketo to know not to add the default unsubscribe URL to the email.
Editing inside your email template in Design Studio is simple. Highlight your email template, right click edit template int he drop down, and do a search for the system unsubscribe text. Look for something like this:
<p><font face="Verdana" size="1">This email was sent to {{lead.Email Address}}. If you no longer wish to receive these emails you may <a href="%mkt_opt_out_prefix%UnsubscribePage.html?mkt_unsubscribe=1&mkt_tok=##MKT_TOK##">unsubscribe</a> at any time. </font></p>
You’ll be replacing with the below code, also this example assumes that you won’t be using the default Marketo unsubscribe landing page or default email text at all. For this example let’s say you’ve embedded a Marketo form on a website page, and you want that page to be used as the unsubscribe landing page instead of Marketo’s Default Page and Text. You’ll then update the above code to something like this:
<p><font face="Verdana" size="1">This email was sent to {{lead.Email Address}}. If you would like to manage your emails click<a href="http://www.yourcompanysitepage.com?mkt_unsubscribe=1&mkt_tok=##MKT_TOK##">unsubscribe</a> at any time. </font></p>
See how the root URL at the beginning of the [<a href=”http://] is unique to your company and includes your new site page url with the ?mkt_unsubscribe=1&mkt_tok=##MKT_TOK## added on at the end. As stated above, Marketo will know not to place their default system text and URL in your emails.
There you have it! Hopefully that gives you enough knowledge to get started updating your default Marketo unsubscribe landing page. If you need additional resources I encourage you to visit Marketo’s Cheat Sheet page, there are a lot of great resources available to you, so you can get the most out of your instance. Happy Marketing!
Curious if you’re leveraging the full power of your marketing tech stack? Request a martech audit and we’ll benchmark your setup.

