At Sponge, we really like Unbounce. It has its own quirks but, generally speaking, it’s a great tool for marketers to create landing pages.
However, the Unbounce Marketo “integration” is definitely in air quotes. With this tutorial, you’ll truly integrate Unbounce forms with Marketo by:
- triggering actual form submission events in Marketo
- and associating the Munchkin cookie with the known lead
>> Related: How to Associate Munchkin Activity with a Non-Marketo Form Using FlowBoost <<
In this post:
Problems with the out-of-the-box Unbounce + Marketo “integration”
- Unbounce uses the rate-limited Marketo REST API to send lead records over to Marketo. That means it’s super easy for nefarious actors to launch a DoS attack, cripple your Marketo instance, and quickly burn through your API limits. Even under normal conditions, you can exceed this rate limit. It could be as simple as getting a spike of event registrations after an invite email is sent. That causes submissions to fail to sync.
- Marketo now offers an endpoint to submit a form via the REST API, but Unbounce still uses the Add to List method. So you’re limited to adding people to static lists in Marketo. That means within Marketo you’ll have to re-create any logic that normally would use a
Filled Out Formtrigger to use theAdded to Listtrigger instead. This can cause a lot of headaches. - Lastly, filling out an Unbounce form does NOT handle the cookie association with the person record in Marketo. New leads via Unbounce form submissions will NOT have their web activity associated with their lead record. Yes, even if you have Munchkin deployed on your Unbounce pages. There are a few solutions proposed on the Unbounce community involving the Munchkin
associateLeadcall, but this has since been deprecated by Marketo. Additionally, these involve either exposing a public function where a user could feed in email addresses to generate valid associator tokens they could use to spam your Marketo instance (a security no-no), or worse, directly exposing your API secret key in a public function (BIG no-no).
Why don’t we embed a Marketo form directly on an Unbounce page?
You can use a Marketo form embedded directly on an Unbounce page, but it makes the design experience clunky: your form won’t be rendered in the Unbounce editor or previews. So you have to publish the page before you can see if the form looks right.
You may also have to set up external conversion tracking on your thank you page in order to track the conversion within Unbounce.
Fortunately, there’s a better way: one that doesn’t consume Marketo API calls, generates a form submit activity in Marketo, and associates the cookie with the known user. This is also what Marketo officially recommends when using third-party forms; Welcome, my friends, to the Marketo Form Submission in the Background.
Step 1: Create Your Marketo Form
Ideally, this is just a blank form, but if you’re embedding it in other places, that’s ok too. Just be sure that any validation you have on this form (e.g. required fields, etc.) exactly matches the validation in the Unbounce form you create in the next step. If not, your Marketo submission may fail.
Step 2: Create Your Unbounce Form
First off, deploy Munchkin on your Unbounce page(s) using the Unbounce Script Manager.
Then create an Unbounce form with your desired form fields.
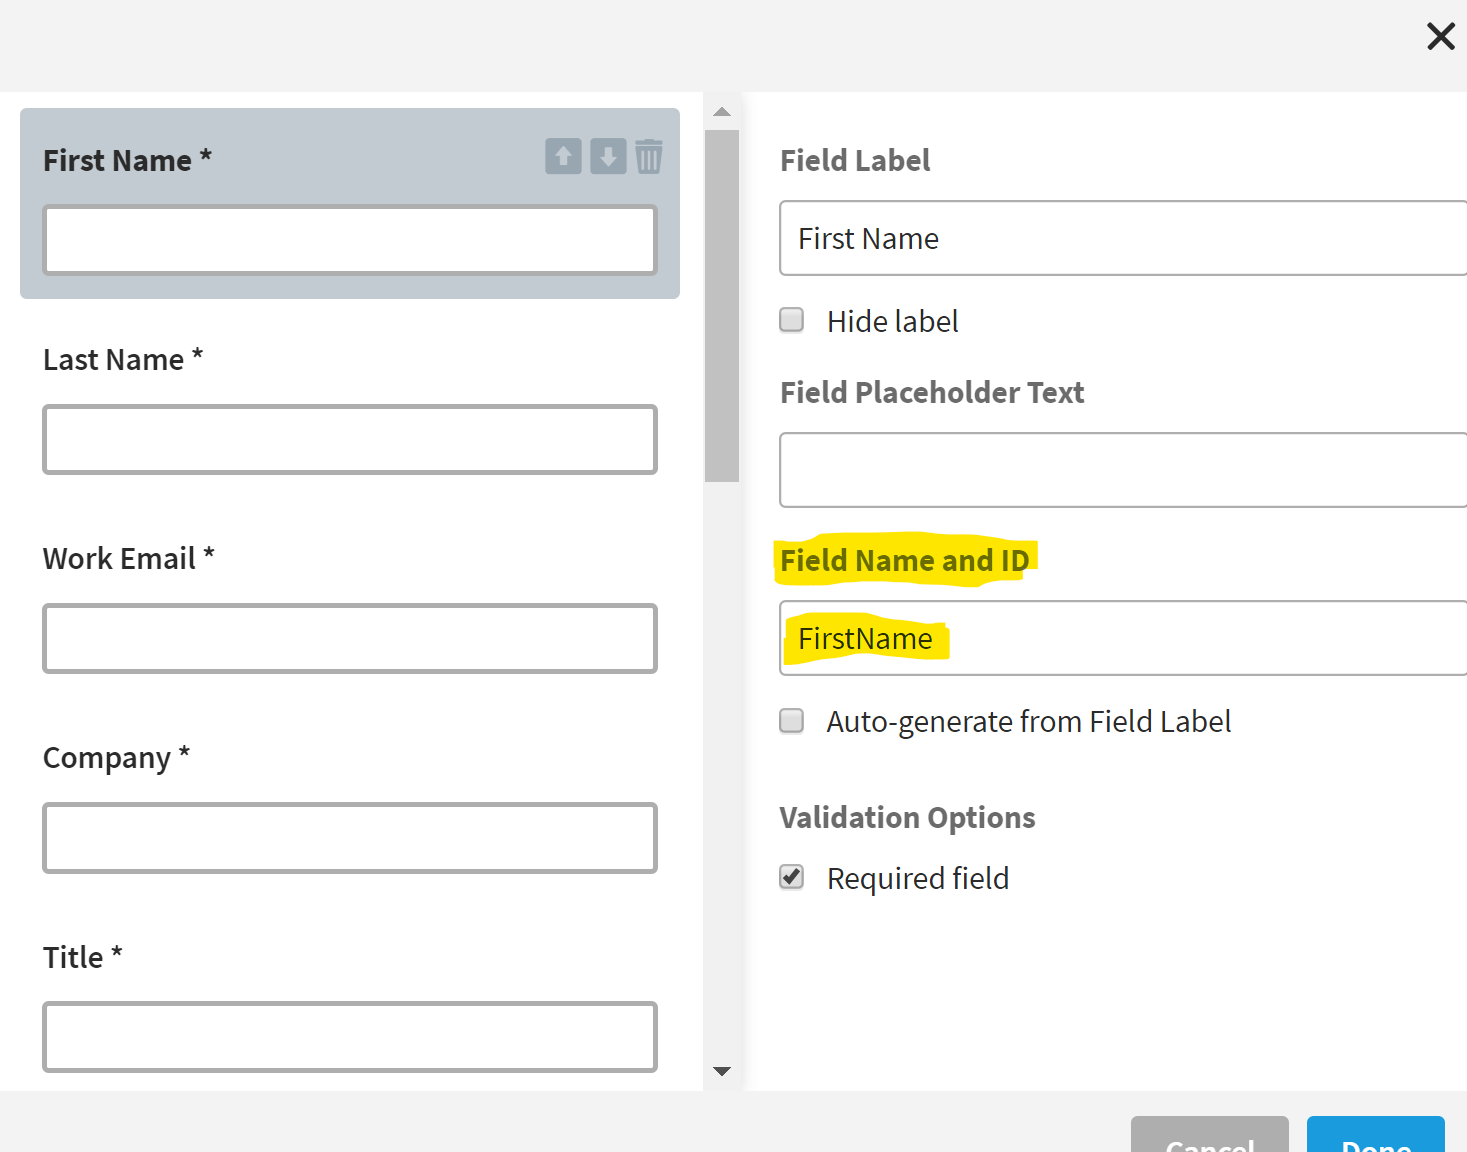
- By default, Unbounce auto-generates a field name and ID. Uncheck this setting when adding new fields.
- Remember the field Name and ID must exactly match the SOAP API Name of the corresponding Marketo field, and they’re case-sensitive. You can access the API names of fields by going to Admin > Field Management > Export Field Names in Marketo.

Step 3: Add Hidden Fields to Your Unbounce Form
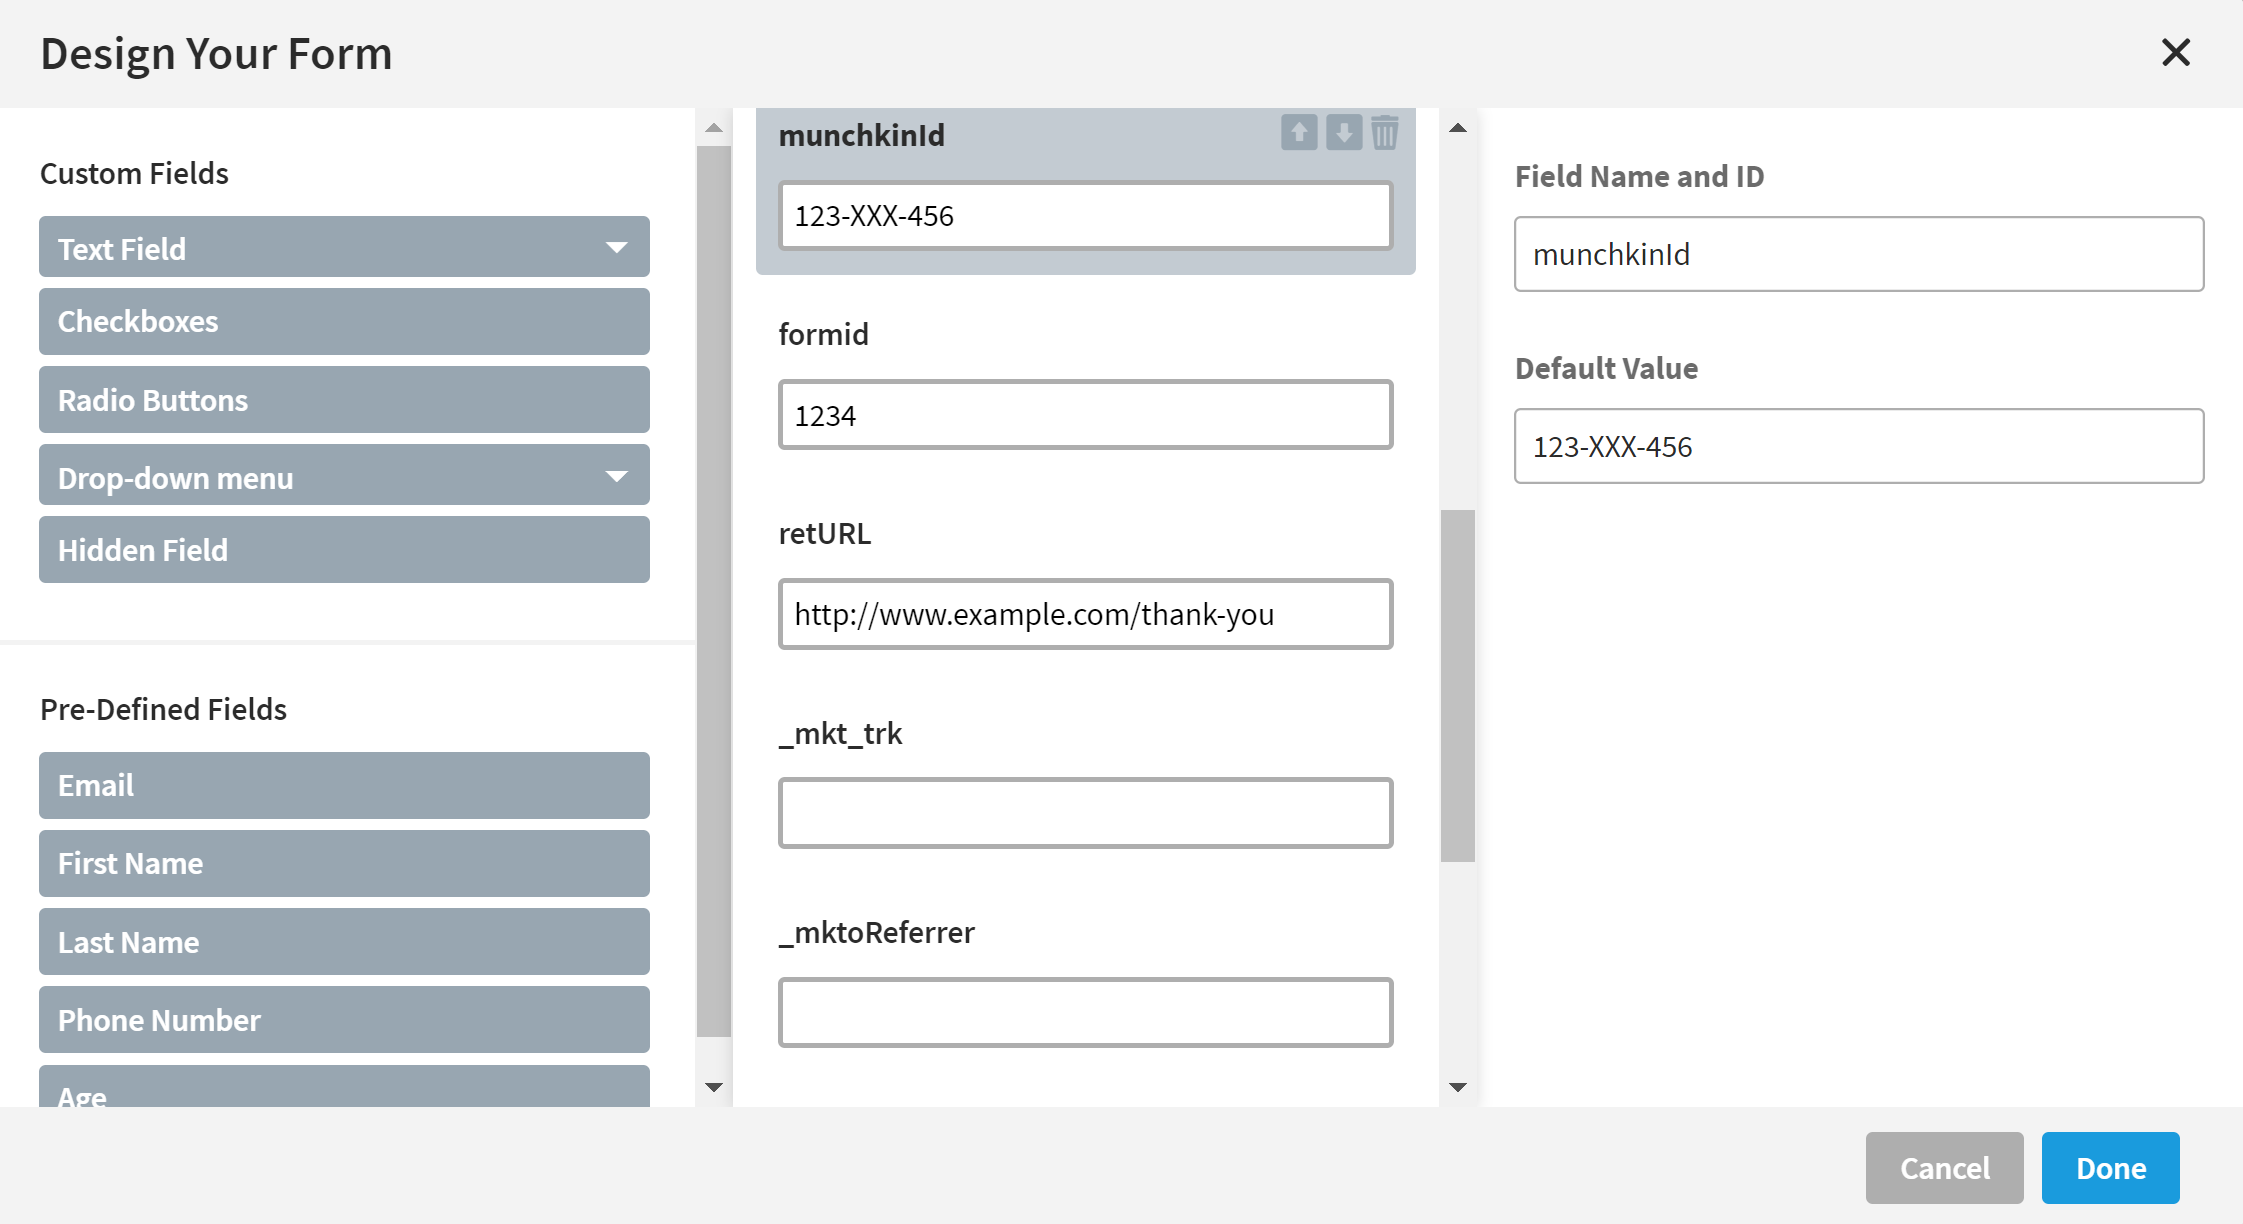
Then add the following case-sensitive hidden fields:
munchkinId– This will always have the same default value, and you can grab this from your instance under Admin > Munchkin > Munchkin Account ID.formid– The four-digit number ID number of the Marketo form. You can access this from the URL of the form asset in Marketo.retURL– The URL you want to redirect the user to after submitting the form (i.e. a thank you page).

Step 4: Add the Marketo Form Submit Script
In order to populate your Marketo form and submit it in the background, download the code from here and deploy it in Unbounce Script Manager. It goes before the body end tag. Be sure to personalize the highlighted sections and wrap the whole thing in <script> and </script> tags.
var config = {
    mktoFormLocation: "app-XXXX.marketo.com",
    munchkinId: "XXX-XXX-XXX", //this will be overridden by the hidden form field value munchkinId, if present
    formid: 1234, //this will be overridden by the hidden form field value formid, if present
    tyLocation: "https://thankyouURL.com/", //this will be overridden by the hidden form field value retURL, if present
    useUBTY: false //set to true if you want Unbounce to handle the post-submission behavior or false to redirect to either the retURL configured in the form or tyLocation above
}
You can grab the mktoFormLocation from the form embed code. It may be an app-XXXX.marketo.com domain or your Landing Page domain.
How the Script Works
For those of you interested in a little code anatomy, what this actually does is evaluates when the page is first loaded if the Unbounce form contains the formid and munchkinId fields. If so, it disables the Unbounce form submit button, loads the Marketo forms library and the Marketo form specified, re-enables the Unbounce form submit button, and adds a function to fill in and submit the Marketo form using the values from the Unbounce form after it submits successfully.
The values in the config object are the defaults, but the munchkinId, formid, and tyLocation values can be overridden by the munchkinId, formid, and retURL form field values. If you set useUBTY to true, the post-submission behavior will be governed by what you configure in the Unbounce Form Confirmation section (e.g. Show form confirmation dialog, Go to URL, etc.). If set to false the page will redirect to the retURL location.
With this Unbounce Marketo integration, you’ll trigger actual form submission events in Marketo, and associate the Munchkin cookie with the known lead.
The Fine Print
- Unbounce forms don’t support progressive profiling. If that is a need, you’ll be better off embedding a Marketo form.
- Unbounce is an external site that won’t support form pre-fill natively. However, there is a solution for this.
- If you choose to have some pages use the Unbounce thank you behavior and some to be redirected to the configured
retURL, instead of deploying through Script Manager, you’ll need to place separate JavaScript on each page. - I recommend saving a fully QAed form as a draft template. Then you/your team can clone it with confidence and just update the hidden
formidandretURLfields for each unique page’s form. - If you already followed the instructions here, you’ll only need to complete Step 4. The
_mkt_trkand_mktoReferrerfields are no longer necessary, but shouldn’t cause any issues. - If you are using Unbounce popups and sticky bars, the Marketo form submit script you added in Step 4 will need to be placed on all live variants directly. Unbounce’s script manager doesn’t apply global scripts to convertibles.
- Likewise for popups and sticky bars, if you use the “referrer” constraint in the Marketo smart campaign trigger “Fills out Form,” you’ll need to use the unique Unbounce Id for the popup or sticky bar to isolate the form fill. It’s found within the Unbounce URL of the convertible. Helpful note: it’s the same Id for all variants.
Want tips, tutorials, best practices, and other cool stuff delivered to your inbox? Subscribe to the quarterly Sponge newsletter >

